 |
| new addition to our family-Selah and big brother Colton |
Wednesday, February 22, 2012


We Want To Know Wednesdays: Pampering Edition

This week Crazymama wants to know how you pamper yourself...
{1} What is your go to color if you paint your nails? do your toes and fingernails match? I love pink...all shades bright & light! Right now, my toes & fingers don't match, but they are in the same color family.
{2} Have you ever gone for a mani/pedi? how often do you go? Mani every 2 weeks {just went yesterday!}, and pedi every 4-6 weeks. {LOVE}
{3} Do you color your hair? do you have a salon do it or do you do it yourself? I mostly do highlights, but not on a regular basis. I tried lowlights around the holidays, but I think I like the lighter tone better. I have an appointment next week-hoping to brighten things up a bit!!
{4} Facials...have you ever had one? I haven't...yet!
{5} Would you or have you ever done botox? I don't think I'll ever even consider it.....
{6} Beauty knows no pain, do you believe in waxing, electrolisis, eyelash extentions, anti-aging creams, micro-dermabrasion, peels, botox? Yes to most of these, but I've only done the waxing {eyebrows}.

Tuesday, February 21, 2012
52 Weeks of Organizing: Taming Paper Clutter

LET'S GET ORGANIZED!!!
Week #3: Paper Clutter
This is a biggie! Paper clutter....since I save pretty much every receipt, bank statement, and who knows what else, we seem to accumulate an awful lot of papers, hence the paper clutter. I've pretty much gotten a system in place {it's only taken me 28 years to do it}, but even with my 4 step system, the paperwork often gets backed up and even overflows! I have narrowed it down to 4 places in our house that important paperwork can be found.


STEP 1: I keep a basket in my kitchen that holds monthly bill paying supplies. I posted about this some time ago, but you can click on this link to read more about it. This works very well for keeping me on track each month. I know exactly where all my bills to be paid are, as well as receipts for that current month {or two}.


I'm linking up to a bowl full of lemons for a linky party: one project at a time-hope you'll join in too!
Friday, February 17, 2012
Valentine Banner & Mantel Sneak Peek
I'm blaming Pinterest for all of this.....all of the DIY projects, the decorating, the crafts, the organization, the cooking & baking {I don't even like to bake...LOL}, my newfound love of scarves and monograms, and anything that involves chalkboard paint! My Dad is pretty much ready to boycott the Pinterest website...LOL, because he is my helper when my latest project involves carpentry {see below post featuring my new ledge shelves}. He really thought I was nuts when I tried to explain that I wanted to turn my old pine sofa table into a mantel...yes, a mantel. :O) I'm obsessed once again, this time with mantels. I shared my love of mantel decor, but we don't have a fireplace that I can decorate with all the cute ideas I've pinned. Then I stumbled on a picture of a "floating" mantel, and the rest is history! Dad did the necessary cosmetic work to the table and voila'....I now have a gorgeous new mantel! I still need to pick up a little more decorative trim to add to the bottom, then I'll post more pictures, all decked out for Spring!!!
I had made a Valentine's Day Banner, but didn't get a chance to hang it this year. After Dad hung up the mantel and I got it painted, I put up the banner to get some pictures. Love it!!


I had made a Valentine's Day Banner, but didn't get a chance to hang it this year. After Dad hung up the mantel and I got it painted, I put up the banner to get some pictures. Love it!!
 |
printable {from Pinterest} and some twine  |
Here is the table I used for the mantel...I've had this little table f-o-r-e-v-e-r! It was definitely time for a makeover.

I painted it China White. It needs a little more trim, but I love it!!!

Check back soon to see the finished project and my Spring mantel decor!
Garlic Lime Chicken

I tried a new recipe for dinner today. It was soooooo good...and easy! I served this yummy Garlic Lime Chicken with some penne noodles w/ butter & fresh parmesan cheese and a salad!! My version of 30-minute meals! :O) I also just recently discovered my new favorite salad dressing- Creamy Poppyseed. I know it's been out there forever, but I just started buying it after eating the best salad in the entire world at Yak & Yeti in Animal Kingdom. My bottle of Kraft doesn't quite measure up to Y&Y's version of poppyseed dressing, but it's as close as we'll get to it until we return next year! Hope you'll give this meal a try!!
Garlic Lime Chicken
3/4 teaspoon salt
1/4 teaspoon black pepper
1/8 teaspoon chili powder
1/8 teaspoon paprika
1/8 teaspoon garlic powder
1/4 teaspoon dried thyme
1/2 teaspoon dried parsley
4 boneless, skinless chicken breast halves
2 tablespoons butter
1 tablespoon olive oil
2 teaspoons minced garlic
1 lime
1. In a small bowl, mix together salt, pepper, chili powder, paprika, garlic powder, thyme and parsley. Sprinkle spice mixture generously on both sides of chicken breasts.
2. Heat butter and olive oil in a large skillet over medium heat. Add garlic and saute lightly. Add chicken and cook until golden brown, about 6 minutes on each side-turn frequently. Sprinkle with the juice of half of the lime. Cook 5 minutes, stirring frequently to coat evenly with sauce. Serve with lime slices as garnish.

Wednesday, February 15, 2012
DIY Ledge Shelves-project complete

A few weeks ago, I posted about some ledge shelves that I saw in Pottery Barn that I really liked{see Ledge Shelves }. I couldn't justify $55 for each shelf, so I bought the wood and Dad made them for me. I finally got them painted, and he came and hung them a few days ago. I {love} them!!! They are perfect!! Thanks Dad!!!
 |
| cost of wood: $18 |
 |
| 4 feet long |
 |
| a few coats of paint (with my free qt. of Glidden paint ) |

 |
| the pictures sit nicely on the ledge |
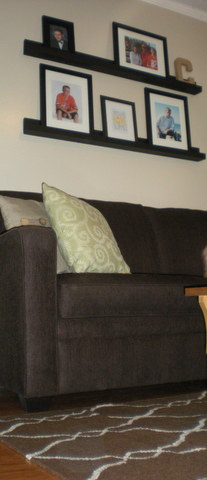 |
| I may change the pictures up a bit, and I'm still looking for a vase to put on the top shelf |
 |
| framed printable from Pinterest |
 |
| The finished project! What do you think? |
Subscribe to:
Posts (Atom)
January 2026 // Life Lately
JANUARY 2026 HAPPY NEW YEAR!! Life Lately....... January was a COLD month....snow, low temps, wind, and ended the month with a frozen cree...

-
Somehow, (back in the 90's), I jumped on the Longaberger basket collecting bandwagon and spent wayyyyy too much money buying monthl...
-
 -Monthly Recipe Challenge- DECEMBER Magnolia Table Cookbook - Joanna Gaines POTATO GRATIN MINI STACKS Got...
-
 Peter usually asks for Lemon Meringue Pie for his birthday (his Nanny's recipe). I noticed that Pioneer Woman's Key Lime Pie is alm...
